

How To Mount A Trolling Motor On An Aluminum Boat
Maneuvering an aluminum boat is exhausting, especially if you are in the water for a long time. For those who detest paddling, a trolling motor is a must-have. It helps in conserving energy and enjoying your fourth dimension in the water. How to mountain a trolling motor on an aluminum boat?
There are iii chief means to mount the motor. It can be washed on the bow, stern, or engine. Depending on the location, you will need to drill holes and spiral the base of the motor or attach information technology to the boat using a clamp.
Read on and I will share some tips so y'all tin can install a trolling motor like a pro. This is an easy job even for someone without experience.

Table of Contents
- What Y'all Will Need
- A Pace-by-Pace Guide
- 1. Mounting on a Bow
- 2. Mounting on a Transom
- iii. Mounting on an Engine
- Pro Tips
- Pick the Right Trolling Motor
- Tighten all Components
- Maintain the Trolling Motor
- Decision
What Yous Volition Demand
Before you start, prepare the materials that you lot will need, which volition depend on the type and the size of the gunkhole, among other things. Beneath are some that you must take.
- Trolling motor
- Electric drill
- Bits
- Marker
A Stride-by-Footstep Guide
In this section, I will suspension downwardly the steps, depending on the specific role of the boat where y'all will install the motor.
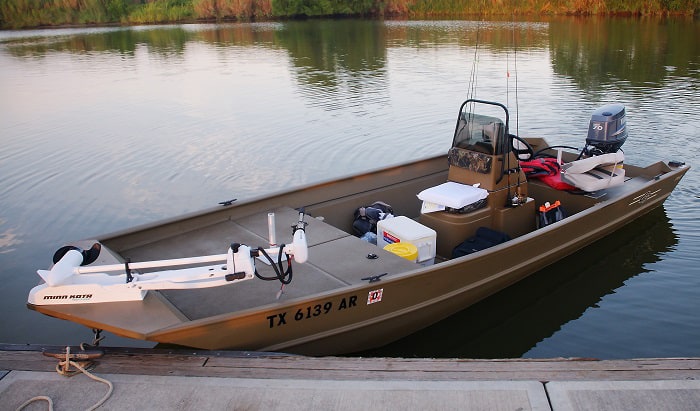
1. Mounting on a Bow
For medium and big boats, the best identify to install a motor is on the bow. This is the front part of the boat. It will pull the gunkhole in the water, providing ameliorate control. In turn, yous will also relish amend precision when steering.
While at that place are many bow-mount trolling motors, i of the best options to consider is Minn Kota Ultrex.
For a visual guide to installing the trolling motor in front end of an aluminum boat, spotter this short video.
- Start by disassembling the motor. Out of the box, the pinnacle and the bottom parts are nevertheless attached.
- Pick a location in the front end of the gunkhole to install the motor. Information technology should be large enough to pull the boat and when it is stowed on the deck. Exit enough clearance to movement the boat without penetrating the hull.
- Put the motor on the top of the boat, aligning it to the specific spot where information technology will be installed. Marker the holes for drilling. Use the template of the mountain to ensure that the holes are in the right place.
- Drill on the marks. The depth will depend on the requirements of the motor, but in virtually cases, it is 6.5mm or ¼-inch. Before drilling, check the bottom part for any obstruction.
- Thread the bolts on the top of every hole of the base.
- Install safe washers under the base of operations and in each commodities. This is important for creating a tighter fit, even if the motor moves.
- Put the motor's base on the top, aligning it to the holes. Level it on the deck surface.
- Position steel washers under each bolt. Tighten until they are secure.
- After attaching the base, connect the motor. At a minimum, it should exist five inches beneath the water.
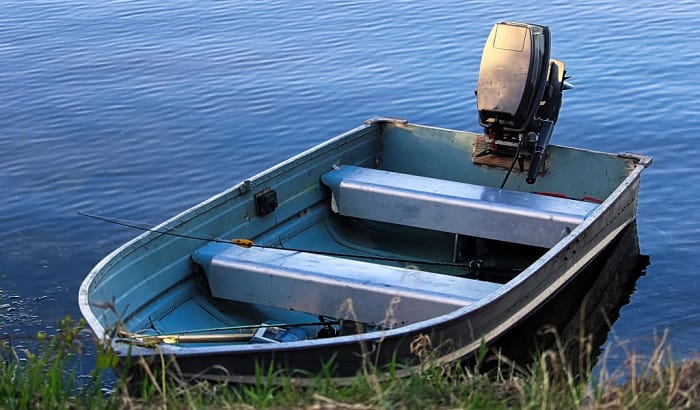
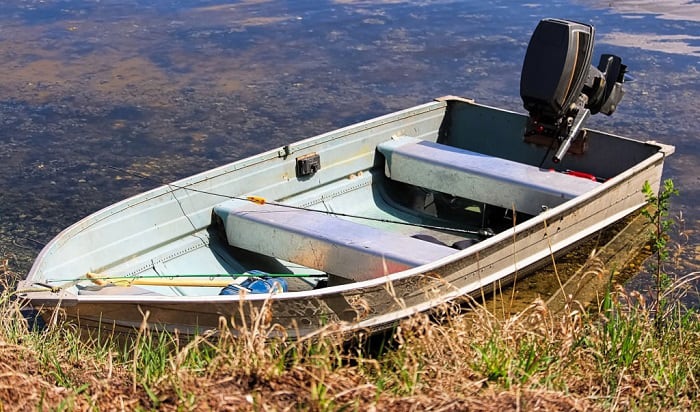
two. Mounting on a Transom
For small aluminum boats, a skilful place to install the motor is on the transom. Y'all can attach it to the stern using a clamp, which simplifies the installation. This is more straightforward compared to bow installation, which requires drilling.
If you are looking for a motor that you can mount in a transom, brand sure to bank check out Newport Vessels NV-series Thrust Saltwater Motor.
- Await for the right spot to mount the motor. Option a smooth and flat surface. It does not need to be in the center.
- Release the clench from the bracket by turning it counterclockwise. Nearly volition have one to 2 clamps that hold the motor on the bracket.
- Fit the motor in the transom without interfering with whatever other component in the stern.
- Adjust the base to create a secure fit and turn the clamp clockwise. Tighten the screws until the base is snug. This volition prevent the base from vibrating and loosening during operation.
3. Mounting on an Engine
Equally it implies, this kind of motor connects to the engine, which thrusts as you steer the gunkhole. It is a keen pick if the gunkhole has no room in the bow or stern for a trolling motor. When the engine is off, the motor submerges. On the other hand, information technology floats when the boat is running. It is dandy in terms of space efficiency, but it is quite tricky to control.
- Locate the anti-cavitation plate of the engine and put the bracket on the top. This is the horizontal plate sitting on the height of the motor. As you do this, the motor must be up.
- Mark holes on the plate depending on the location of the holes on the surface of the trolling motor.
- Drill the marks with a bit that is sharp enough to penetrate through hard cloth.
- Put the motor on the top. Screw and tighten the bolts. Run across to it that they are secure enough to prevent unnecessary movements when the motor runs.
Pro Tips
Aside from learning the right steps for trolling motor installation, beneath are some of the most of import tips to keep in listen.
Pick the Right Trolling Motor
Not all trolling motors are the same. Selection one that is suitable for the blazon of boat that y'all have and the conditions of the water.
For saltwater application, look for 1 made of rust and corrosion-resistant materials. A tough structure is a must to ensure durability. For freshwater utilise, yous do not have to be every bit picky as long as information technology is long-lasting.
You tin can also choose a trolling motor depending on its mode of functioning – by mitt or human foot. Hand-operated motors are easier to use and are not speedily decumbent to weed and debris aggregating.
Many modern trolling motors have innovative features, such as a GPS. This means that the motor will work on its own. It car-pilots, knowing exactly where information technology should go when the motor is running.
The size is equally important. Information technology dictates the thrust that the motor will generate. This should lucifer the length of the boat where you will attach the motor.
Tighten all Components
Whether the trolling motor attaches to an aluminum boat through bolts or clamps, secure all the connections. If information technology is loose, the base and the motor will wobble. Every bit a result, this volition negatively bear on the boat's safety and functioning.
Maintain the Trolling Motor
It is not enough that you lot install the motor properly. The exposure to dirt and debris compromises functionality. Audit and clean regularly. Lubricate the moving parts to maintain them in their height condition.
Conclusion
Say goodbye to paddling endlessly! Make it easier to navigate calm waters and enjoy line-fishing by calculation a trolling motor to your boat.
Calculation a trolling motor to an aluminum boat is intimidating at kickoff. Nonetheless, information technology is an easy task that requires only a drill and the motor itself. You can spiral or clench information technology on the boat, depending on where you volition install it.
Looking for a trolling motor for your boat? Cheque out Minn Kota Ultrex and Newport Vessels NV-series Thrust Saltwater Motor. Besides, you also can refer to marine antifreeze that can help y'all winterize an outboard boat motor.
Did y'all enjoy reading this tutorial on how to mountain a trolling motor on an aluminum boat? Do you have any tips to share about the installation of a trolling motor? Make sure to let us know in the comment section.

I am passionate almost h2o sports and technical fields, and so combining both makes me interested in making contents about boat accessories. With my partner, we went on many trips and sports games together, which led us to think near how we can spread our joys and passions to many people.
Source: https://www.ridetheducksofseattle.com/how-to-mount-a-trolling-motor-on-an-aluminum-boat/
0 Response to "How To Mount A Trolling Motor On An Aluminum Boat"
Post a Comment